Autogenic Drainage
Original Editor - The Open Physio project.
Top Contributors - Kim Jackson, Rachael Lowe, Admin, Jarapla Srinivas Nayak, WikiSysop, Uchechukwu Chukwuemeka, Shreya Pavaskar, Tony Lowe, Evan Thomas, Oyemi Sillo, Adam Vallely Farrell and Emily Mulligan
Background history[edit | edit source]
Who Developed it ?[edit | edit source]
Autogenic drainage was developed in Belgium in the late 1960's by Chevaillier . During 1980's utilized throughout Europe to treat asthmatic patients who had suffered retention of secretions in the chest and an difficulty in clearing the secretions.
http://bronchiectasis.com.au/resources/videos/autogenic-drainage
What is Autogenic Drainage?[edit | edit source]
Autogenic Drainage (AD), is a airway clearance technique that uses controlled breathing and minimal coughing to clear secretions from your chest. It involves hearing and feeling your secretions as you breathe out and controlling the desire to cough until secretions are high up and easily reached with minimal effort.
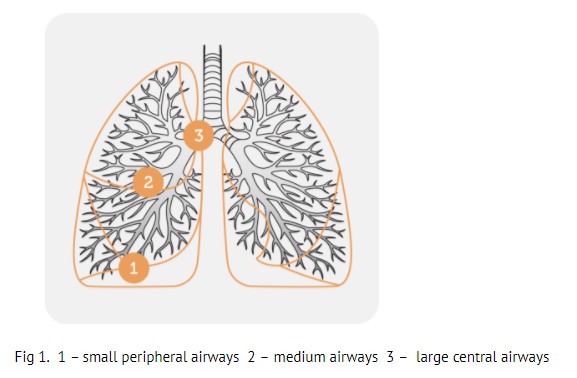
It uses breathing at different lung volumes to loosen, mobilise and move secretions in three stages towards the larger central airways. (fig.1)
It consists of three stages:
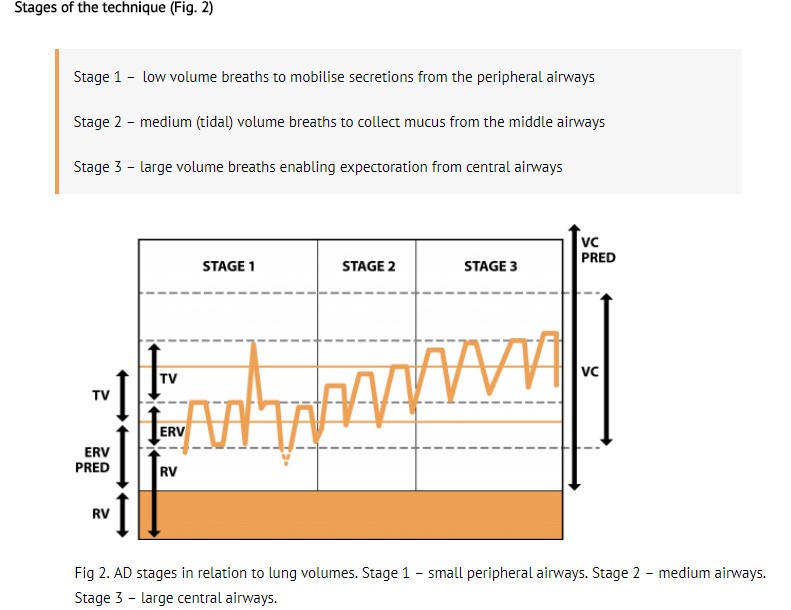
Stage 1 :- Unstick secretions - breathe as much air out of your chest as you can then take a small breath in, using your tummy, feeling your breath at the bottom of your chest. You may hear secretions start to crackle. Resist any desire to cough.
Loosening peripheral secretions by breathing at low lung volumes (slow, deep air movement)
Repeat for at least 3 breaths.
Stage 2 :-Collect secretions - as the crackle of secretions starts to get louder change to medium sized breaths in. Feel the breaths more in the middle of your chest.
Repeat for at least 3 breaths.
Collecting secretions from central airways by breathing at low to middle lung volumes (slow, mid-range air movement)
Stage 3:-Evacuate secretions - when the crackles are louder still, take long, slow, full breaths in to your absolute maximum.
Repeat for at least 3 breaths.
Expelling secretions from the central airways by breathing at mid to high lung volumes (shallow air movements)
The velocity or force of the expiratory airflow must be adjusted at each level of inspiration so that the highest possible airflow is reached in that generation of bronchi, without being high enough to cause the airways to collapse during coughing. Autogenic drainage does not utilise Postural Drainage positions but is performed while sitting upright.
Rationale behind the Autogenic Drainage Technique[edit | edit source]
The rationale for the technique is the generation of shearing forces induced by airflow. The speed of the expiratory flow may mobilise secretions by shearing them from the bronchial walls and transporting them from the peripheral to the central airways.
How to do it ?[edit | edit source]
Posture:
- Choose a breath-stimulating position like sitting or reclining. Relax, with the neck slightly extended.
- Clear your nose and throat by blowing your nose and huffing.
Breathing in - Slowly breathe in through the nose to keep the upper airways open. Use the diaphragm and/or the abdomen if possible.
- First take a large breath in, hold it for a moment. Breathe all the way out for as long as you can. Now you are at low lung volume. See picture below. The size of breath and level at which you breathe depends on where the mucus is located.
- Take a small to normal breath in, and pause. Hold your breath for about 3 seconds. All the upper airways should be kept open. This improves the even filling of all lung parts. The pause allows time for the air to get behind the mucus.
Breathing out - Breathe out through the mouth. Keep the upper airways open. This is your glottis, throat and mouth. Breathing out is done in a sighing manner. When you force your breath out the airways can collapse. You will hear a wheeze.
- At low lung level breathing use your abdominal muscles. Squeeze all the air out until you can breathe out no more.
- You hear the mucus rattling in the airways when breathing the right way. Put a hand on your upper chest, and feel the mucus vibrating. High frequencies mean that the mucus is in the small airways. Low frequencies mean that the mucus is in the large airways. Using this feedback lets you easily adjust the technique.
- Repeat the cycle. Inhale slowly to avoid sending the mucus back down. Keep breathing at the low level until the mucus collects and moves upward. Signs of this are:
- Crackling of the mucus can be heard as you exhale.
- You feel the mucus moving up.
- You feel a strong urge to cough.
- The level of breathing is raised when any of the above occurs. Refer to the picture below. Moving the breathing from lower to higher lung area takes the mucus with it.
- Finally the collected mucus reaches the large airways where it can be cleared by a high lung volume huff. Don't cough until the mucus is in the larger airways. Cough only if a huff did not move the mucus to the mouth.
- You have now finished one cycle. Take a break of one to two minutes. Relax and perform breathing control before you start on the next cycle. The cycles are repeated during the session. A session lasts between twenty to forty-five minutes or until you feel all the mucus has been cleared. Do sessions of AD more often if you still have mucus present at the end of a session.
Resources
[edit | edit source]
Paula Agostini and Nicola Knowles, Autogenic drainage: the technique, physiological basis and evidence, Physiotherapy, Volume 93, Issue 2, June 2007, Pages 157-163
Autogenic Drainage by Dr. Vinod Ravaliya, MPT
Recent Related Research (from Pubmed)[edit | edit source]
Failed to load RSS feed from http://eutils.ncbi.nlm.nih.gov/entrez/eutils/erss.cgi?rss_guid=1t3jTOU: Error parsing XML for RSS
References[edit | edit source]
References will automatically be added here, see adding references tutorial.


