Dynamic Hip Screw - DHS: Difference between revisions
(exercises) |
(weight bearing status) |
||
| Line 10: | Line 10: | ||
== Physiotherapy Interventions == | == Physiotherapy Interventions == | ||
Considerations post surgery: | Considerations post surgery: | ||
* Post op instructions and '''weight bearing status''' | * Post op instructions and '''[https://physio-pedia.com/Weight_bearing?utm_source=physiopedia&utm_medium=search&utm_campaign=ongoing_internal weight bearing status]''' | ||
* Infections | * Infections | ||
* Neurovascular complications | * Neurovascular complications | ||
Revision as of 22:07, 21 September 2020
Purpose[edit | edit source]
The Dynamic Hip Screw (DHS) or Sliding Hip Screw can be used as a fixation for neck of femur fractures. This would usually be considered for fractures that occur outside the hip capsule (extracapsular), often stable intertrochaneric fractures[1]. This is because there is a reduced chance of interrupting the blood supply to the head of the femur, and so it may be possible to preserve the joint. However, it may also be appropriate for younger patients with fractures within the hip capsule (intracapsular) if there is a good chance that the blood supply is preserved, reducing the risk of avasular necrosis.
Technique[edit | edit source]
History of the DHS[edit | edit source]
Prior to the use of DHS sliding screws, angled blade plates were used[2]. These fixed plates matched the angle of the femural head. These plates had a number of complications, including failure to purchase, requiring frequent osteotomies. They also did not allow any compression across the fracture site, leading to stress failures and frequent non-union[2]. Therefore, the DHS, with sliding barrel, was created to allow controlled compression across the fracture site. This is important for bone healing.
NICE Guidelines recommend: Use extramedullary implants such as a sliding hip screw in preference to an intramedullary nail in patients with trochanteric fractures above and including the lesser trochanter (AO classification types A1 and A2)[3].
Physiotherapy Interventions[edit | edit source]
Considerations post surgery:
- Post op instructions and weight bearing status
- Infections
- Neurovascular complications
- Pain
- Self-efficacy and motivation
- Fear of falling
Any transfer or mobility aids will be determined by the weight bearing status (usually highlighted in the op note). If the surgeon feels the hip needs protecting post surgery, they may advise partial or non-weight bearing for the patient.
Physiotherapy interventions:
- Transfers (bed, chair, toiletting).
- Mobility (+/- appropriate aid).
- Goal setting
- Advising patient and team on pain management and expectations post-surgery
- Advised on swelling management
- Exercises
- Balance retraining and confidence building
- Gait retraining
- Considering home environment.
- Interactions with family and carer
It is important that the patient is transferred out of bed, within these limitations, as early as possible to avoid complications of bed rest (e.g. chest infections, DVT, muscle atrophy). NICE guidelines advise, unless contraindicated, for patient's to mobilise the day after surgery. [3]
Physiotherapy exercises post hip surgery:
| After surgery | After 6 weeks | ||
|---|---|---|---|
| Supine | Hip ABD and heel slides (slide sheet can reduce friction) | Inner Range Quads | Bridges (unless NWB) |
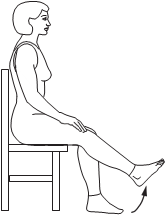
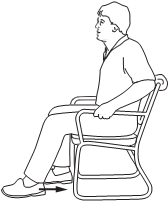
| Sitting | Knee extension | Knee flexion | Sit to stand (one balance optimised) |
| Standing |
Standing Exercises
Do these once you’re able to stand safely. When doing these exercises, remember to stand straight and tuck in your pelvis and buttocks. Do these exercises with your operated leg only.
Standing against a countertop or wall with bar for support is safer than a chair. If you do use a chair, make sure it’s sturdy.
Exercise #1
- Stand with support.
- Slowly move your leg out to the side, and then back. Keep your leg straight at all times.
- Repeat.
Exercise #2
- Stand with support.
- Keeping your back and legs straight, slowly move your leg behind you. Keep the leg straight. Be careful not to lean forward.
- Repeat.
Exercise #3
- Stand with support.
- Lift your knee up as if going up a stair.
- Hold for a count of 3 to 5.
- Place your foot back on the floor.
- Repeat.
Exercise #4
- Stand with support.
- Bend your knee by lifting your heel up towards your buttocks. Don’t move your thigh forward.
- Hold for a count of 3 to 5.
- Slowly lower your foot to floor.
- Repeat.
Hip Exercises: Phase 2[edit | edit source]
You can start these exercises 6 weeks after surgery and once you’re comfortable with all the Phase 1 exercises. If they hurt too much, check with your doctor or surgeon.
Start with a few at a time and do them often. Do them at least 2 times a day, repeating each exercise 5 to 10 times. Slowly increase to 4 times a day, repeating each exercise 30 times. Do all exercises slowly and with control.
Bed Exercises
Exercise #1
- Lie on your back with knees bent and feet shoulder-width apart.
- Lift hips toward the ceiling.
- Hold for a count of 3 to 5. Remember to breathe.
- Slowly return to the starting position.
- Repeat.
Exercise #2
- Lie on your side with hips and knees bent. You can add a pillow between your legs for comfort or if you were told to.
- Keep your feet together. Remember not to twist or use your back muscles.
- Lift the top knee, like a clamshell opening.
- Hold for a count of 3 to 5 and slowly lower the knee.
- Repeat.
Exercise #3
- Lie on your side, with the bottom leg bent to stop you from rolling onto your back.
- Keeping the top leg straight, lift it towards the ceiling, making sure not to roll forward or backward. Keep your knee facing forward.
- Slowly lower the leg.
- Repeat.
Standing Exercises
Do these exercises once you’re able to stand safely. When doing these standing exercises, remember to stand straight and tuck in your pelvis and buttocks.
Standing against a countertop or wall with bar for support is safer than using a chair. If you do use a chair, make sure it’s sturdy).
Exercise #1
- Stand with support.
- Gently rise up on your toes
- Hold for a count of 3 to 5.
- Return your feet flat on the ground.
- Repeat.
Exercise #2
- Stand with support.
- Keep your feet shoulder-width apart.
- Bend your hips and knees while keeping your back straight. Make sure your knees don’t go past your toes.
- Hold for a count of 3 to 5.
- Squeeze buttocks and thigh muscles to stand up straight.
- Repeat.
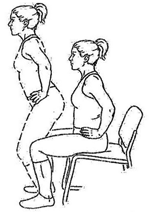
Exercise #3
- Sit on edge of chair, with your feet flat on floor.
- With your hands on your hips, stand up straight.
- Stand for a count of 3 to 5 and then sit back down.
- Repeat.
Evidence[edit | edit source]
Provide the evidence for this technique here
Resources[edit | edit source]
Youtube - DHS surgery
References[edit | edit source]
- ↑ Dodds et al (2004) The Sliding Hip Screw Current Opinion in Orthopaedics Volume 15, Issue 1 pp12-17
- ↑ 2.0 2.1 Singh A.P. Dynamic Hip Screw Or Sliding Hip Screw. [online] Available at: <http://www.boneandspine.com/dynamic-hip-screw/> [Accessed 19 September 2020].
- ↑ 3.0 3.1 NICE (2017) Hip Fracture: Management National Institute for Health and Care Excellence [online] <available from: https://www.nice.org.uk/guidance/cg124/chapter/Recommendations#analgesia>


