Manual Muscle Testing: Hip Flexion
Original Editor - Claire Knott
Top Contributors - Whitney Wagganer, Kaitlyn Carroll, Tony Varela, Claire Knott, Lucinda hampton, Kim Jackson and Wanda van Niekerk
Welcome to Arkansas Colleges of Health Education School of Physical Therapy Musculoskeletal 1 Project. This space was created by and for the students at Arkansas Colleges of Health Education School in the United States. Please do not edit unless you are involved in this project, but please come back in the near future to check out new information!!
Introduction[edit | edit source]
An assessment of muscle strength is typically performed as part of a patient's objective assessment and is an important component of the physical exam that can reveal information about the comparison of the involved leg versus the uninvolved leg. This test can help the therapist determine what strength the patient was at prior to injury or trauma. It is used to evaluate weakness and can be effective in differentiating true weakness from imbalances or poor endurance. See Muscle Strength Testing
Muscles Involved[edit | edit source]
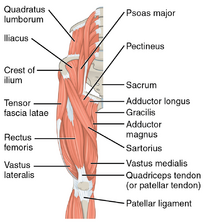
There are four main muscles that flex the hip. There are two-joint muscles which are the Sartorius, Tensor Fasciae Latae, and Rectus Femoris. These muscles cross both the knee and the hip. Conversely, there is only a single one-joint muscle, known as the Iliopsoas, which only crosses at the hip.
- Iliopsoas
- Tensor Fasciae Latae
- Sartorius
- Rectus femoris
Image 1: Anterior hip/thigh muscles.
MMT Grading Scale[edit | edit source]
| Grade | Description | Explanation of Grade |
|---|---|---|
| 0 | Zero | Contraction isn't visible or felt when palpated. |
| 1 | Trace | Contraction is visible or felt when palpated. |
| 2- | Poor- | Patient is tested in gravity eliminated position with partial AROM(active range of motion). |
| 2 | Poor | Patient is tested in gravity eliminated position with full AROM. |
| 2+ | Poor+ | Patient is tested in gravity eliminated position with full AROM along with some resistance from therapist. |
| 3- | Fair- | Patient slowly comes out of testing position. |
| 3 | Fair | Patient can hold against gravity without resistance. |
| 3+ | Fair+ | Patient can hold against gravity with 1-24% of the therapist's force. |
| 4- | Good- | Patient can hold against gravity with 25-49% of the therapist's force. |
| 4 | Good | Patient can hold against gravity with 50-74% of the therapist's force. |
| 4+ | Good+ | Patient can hold against gravity with 75-95% of the therapist's force. |
| 5 | Normal | Patient can hold against gravity with more than 95% of the therapist's force or therapist was unable to break the patient out of the testing position. |
Patient Positioning[edit | edit source]
- Grades 3 to 5 - Patient is in short sitting with thighs supported
- Grades 0-2 - Patient is in side lying ('gravity minimal' position)
Therapist Position[edit | edit source]
- Therapist to stand next to test side closest to the hip that is being tested.
- Therapist should adjust the table or seat to avoid any future injures of the therapist. The therapist body is important too, especially since one will be doing this for years to come. Protect your body by what one can control. If therapists can protect their own body, they can't help others.
- Therapist will cross their arms to perform the test by one hand on the patient's shoulder to stabilize the patient and the other hand on the distal femur to apply force directly against the hip flexor. The cross-over method with help protect the therapist's shoulders and posture.
To Test[edit | edit source]
- Start with the patient in a seated position on a treatment table or chair that doesn't have arm rests.
- Have the patient put hands on the table. Do not allow the patient to grip the table, which could allow the patient to compensate and alter the test results. Have the patient's feet not touching the floor to avoid any possible compensations as well.
- To test the hip flexors as a whole, therapist will bring the patient's tested leg into hip flexion at mid range and ask the patient to perform that motion without assistance. To test Iliopsoas only, therapist will bring the patient's tested leg into hip flexion at end range and ask the patient to perform that motion without assistance.
- If the patient can perform the motion against gravity, continue the test in the seated position. If the patient was unable to perform the motion against gravity, put the patient in side-lying for a gravity eliminated position to test the grade of the hip flexors.
- Apply resistance over the distal femur in a direction opposite to flexion[1] . Therapist will cross their arms, one hand on the patient's shoulder (same side as the tested hip) that will stabilize the patient and the other hand at the distal femur that will be used to apply the force against the hip flexors. See image 2.
- The grading will depend on the amount of force the therapist demonstrates to break the patient out of testing position.
- To satisfy grade 5 'normal muscle' performance criteria, the patient must have the ability to move through complete range of motion (active resistance testing) OR maintain an end point range (break testing) against maximum resistance.
<iframe title='Play video' src='//www.youtube.com/embed/50sRc1jHqfw?' width='640' height='360' frameborder='0' allowfullscreen='true'></iframe>
https://youtu.be/lJHs6JcdnRo
References[edit | edit source]
- ↑ Hislop H, Avers D, Brown M. Daniels and Worthingham's muscle Testing-E-Book: Techniques of manual examination and performance testing. Elsevier Health Sciences; 2013 Sep 27.


