Wheelchair Preparation: Difference between revisions
No edit summary |
No edit summary |
||
| Line 326: | Line 326: | ||
•Many children who use wheelchairs need additional postural support. | •Many children who use wheelchairs need additional postural support. | ||
== Checking Cushion fit == | === Checking Cushion fit === | ||
Always check that the seat bones sit just within the seat bone well and not on the edge or on the high part of the cushion. Always check when fitting a pressure relief cushion for a wheelchair user that: | Always check that the seat bones sit just within the seat bone well and not on the edge or on the high part of the cushion. Always check when fitting a pressure relief cushion for a wheelchair user that: | ||
Revision as of 05:07, 15 June 2018
Original Editor - Vidya Acharya
Top Contributors - Vidya Acharya, Naomi O'Reilly, Laura Ritchie, Kim Jackson, Amrita Patro and Jess Bell
Introduction[edit | edit source]
The wheelchair service provision process is not simply assessment followed by prescription; but providing a client with an appropriate wheelchair[1]. Wheelchair preparation is the Step number five, as per the eight steps of wheelchair service delivery, described in the WHO guidelines on the provision of manual wheelchairs in less resourced settings[2].
The objective of good practice in product preparation is to prepare the wheelchair for the fitting, including modifications or custom postural support component[3].
Once the equipment is received, the wheelchair base/frame, accessories, and seating and positioning components should be assembled and set-up according to the preliminary specifications detailed in the recommendation and selection process.[1] This includes fabrication and installation of custom items and assessment of the function and operation of all mechanical components.
Wheelchair preparation includes[4][edit | edit source]
• preparing the wheelchair to match the wheelchair user’s prescription (selection);
• checking the wheelchair to make sure that it is safe and ready to be used and all parts are working properly.
Good practice in product preparation[3][edit | edit source]
- Each wheelchair being prepared is labeled with the user’s name and a serial number or barcode.
- Modifications to wheelchairs (permanently altering the frame or a component of the wheelchair) are carried out only by personnel with the appropriate knowledge and skills, since any such modification may have structural and functional implications.
- The production and installation of custom seating systems or individual postural support components should be carried out by personnel with the appropriate knowledge and skills. This work should also be done in close collaboration with the assessment personnel.
- All mobility equipments should be checked for quality and safety before the user tries it.
Steps in preparing the wheelchair[4][edit | edit source]
Prepare the wheelchair in the following order:
1. Check that the wheelchair seat width and depth measurements are correct for the prescription (selection).
2. Check that the cushion width and depth match the seat.
3. Adjust (where possible):
• Backrest height and angle;
• Armrests height;
• Rear wheels position;
• Brakes position;
• Footrests height;
• Push handles height;
• Any other adjustments.
4. Carry out a “wheelchair safe and ready” check.
Wheelchair Safe and Ready Checklist:[edit | edit source]
Use the checklist below to make sure that the wheelchair is safe to use and all parts are working. Always do this before the wheelchair user tries the wheelchair[4]
| For the whole wheelchair | How to check | |
| There are no sharp edges | Check all over the wheelchair with eyes and hands | |
| No parts are damaged or scratched. | ||
| The wheelchair travels in a straight line | Push the wheelchair away from you, making sure the castor wheels are in the “trail” position. | |
| Front castor wheels | ||
| Spin freely. | Tip the wheelchair on to the back wheels. Spin the castor wheels. | |
| Spin without touching the fork. | ||
| Bolts are tight. | Check. They should feel firm. Do not over tighten. | |
| Front castor barrels | ||
| Castor fork spins freely. | Tip the wheelchair on to the back wheels. Spin the castor fork around. | |
| Rear wheels | ||
| Spin freely. | Tip the wheelchair sideways on to one rear wheel. Spin the other wheel. Check the other side. | |
| Axle bolts are tight. | Check. They should feel firm. Do not over tighten. | |
| Tyres (if those are pneumatic) are inflated correctly. | Press on the tyres with your thumb. The wheel should depress a little, but no more than 5 mm. | |
| Push rims are secure | Check | |
| Brakes | ||
| Function properly | Apply brakes. Check the wheelchair cannot be moved. | |
| Footrests | ||
| Footrests are securely attached. | Check. | |
| Frame | ||
| Cross-folding wheelchair folds and unfolds easily. | Fold the wheelchair to check that the folding mechanisms are working correctly. | |
| Fold-down backrest – the backrest folds and unfolds easily. | ||
| Cushion | ||
| The cushion is in the cover correctly. | Usually the cushion cover is done up at the back of the cushion, underneath. | |
| The cushion is sitting on the wheelchair correctly. | If the cushion is contoured, the “well” for the seat bones should be at the back of the seat. | |
| The cushion cover fabric is tight but not too tight. | The cushion cover should not stretch tightly over any contours of the cushion. | |
| The cushion fully covers the seat | Check that no part of the seat is visible from under the cushion. This is particularly important for solid seats. | |
Cushion Fabrication[4][edit | edit source]
- If foam is available, wheelchair service personnel can make a foam pressure relief cushion with just a few tools. Personnel need to know what foam to use, and a few important dimensions.
- Discuss with the trainers the availability of foam and type of foam suitable for a pressure relief cushion.
- The instructions below show how to make a basic foam pressure relief cushion, with two key contours. These are a “well” under the seat bones and a shelf in front of the seat bones.
Cushion Features and Dimensions[edit | edit source]
The main features of the basic foam contoured cushion are the following:-
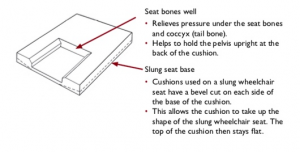
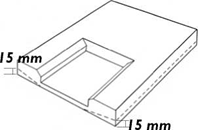
1.A base layer, made with a firm foam (for example “chip” foam):
- Seat bones well
Relieves pressure under the seat bones and coccyx (tail bone).
Helps to hold the pelvis upright at the back of the cushion.
- Slung seat base
Cushions used on a slung wheelchair seat have a bevel cut on each side of the base of the cushion.This allows the cushion to take up the shape of the slung wheelchair seat. The top of the cushion then stays flat.
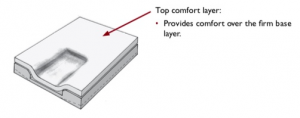
2.A top layer, made with a soft “comfort” foam:
Top comfort layer: Provides comfort over the firm base layer.
How to Make a Pressure Relief Cushion Base[edit | edit source]
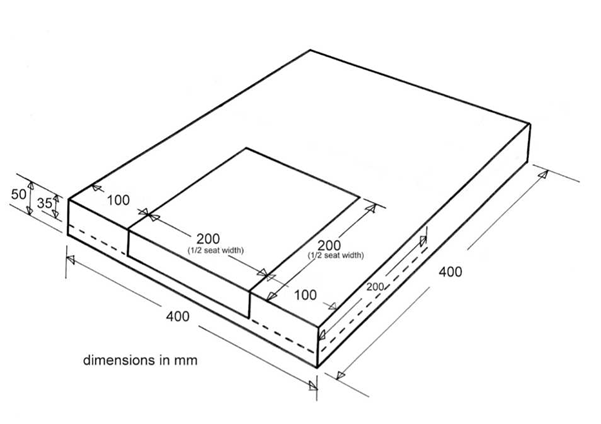
The following instructions provide a cushion of dimensions 400 mm wide x 400 mm deep x 50 mm high. The seat bones well is 200 mm wide x 200 mm deep x 35 mm high. This cushion would be suitable for a wheelchair user with a seat width of 400 mm. Adapt the dimensions to suit the size of each wheelchair user as described in the box below.
1. Mark out the cut lines on the firm foam:• Start with a piece of firm foam 400 mm x 400 mm x 50 mm.
•The centre of the seat bones well must be on the centre line of the cushion.
•For this size cushion, the seat bones well should measure 200 mm x 200 mm x 35 mm.
•Draw the cut lines with a dark coloured marker on all six sides of the base foam.
Dimensions of Seat Bones Well[edit | edit source]
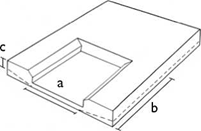
Adjust the dimensions of the cushion and the seat bones well to suit individual wheelchair users as follows:
• seat bones well width = ½ the wheelchair user’s seat width or 200 mm (whichever is less) [a];
• seat bones well depth (front to back) = ½ the wheelchair user’s seat width or 200 mm (whichever is less) [b];
• seat bones well height = 35 mm for adults and 20–25 mm for children [c].
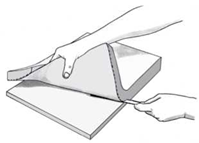
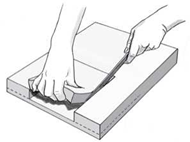
2. Cut out the seat bones well: Use a sharpened hacksaw blade or long knife. Use long slow strokes, cutting mostly when pulling to improve control.
• First cut through the back of the cushion to the depth of the seat bones well.
• Then slice out the seat bones well.
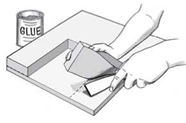
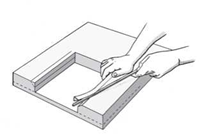
• Glue back into place the two “flaps” left on either side of the seat bones well. Allow the glue to set until not completely dried and slightly sticky to touch. Then press the foam together.
3. Cut off (bevel) the corners inside the seat bones well.
4. For a slung seat cushion: make an angled cut (bevel) on both sides of the base (under-side).
5. Place the top foam layer on top of the cushion.
• Both the base and top layer are placed in the cushion cover together.
• The two layers do not need to be glued together.
• If the top layer becomes soiled or worn, it can be washed and dried, or replaced.
• A lift can be added within the cover to increase the depth of the seat bones well.
Frequently Asked Questions about Foam Pressure Relief Cushions[4][edit | edit source]
1. How do you decide which fabric to use for the cushion cover?[edit | edit source]
• Choose a fabric which is stretchy if possible. Water-resistant fabric is very good if available. If the fabric is water-resistant make sure it is not too thick, or the folds may cause marking on the wheelchair user’s skin, which can lead to a pressure sore.
• The choice will depend on the fabric available. Sometimes the choice is limited.
• If there is a choice and you are not sure, ask wheelchair users to trial different options.
• Wheelchair service personnel will develop experience as different fabrics are tried.
2. Does this cushion work for all users?[edit | edit source]
• No – this cushion will not work for all wheelchair users.
• However, one advantage of this cushion is that it can be easily adapted.
3. Is this cushion hot or does it cause sweating?[edit | edit source]
• Foam cushions can be hot and can cause sweating.
• However, the cushion performs well in many other ways, so putting up with the heat is a compromise.
4. Do all wheelchair users need a pressure relief cushion?[edit | edit source]
• Consider the pressure risk factors to decide whether a wheelchair user is at risk of developing a pressure sore.
• Although this cushion may not be needed for pressure relief, the cushion can also improve comfort and posture, even for wheelchair users who are not at risk of developing pressure sores.
5. What happens if the cushion is used back-to-front or upside down?[edit | edit source]
• It will not work properly and may even increase the risk of developing pressure sores.
• Always make sure that wheelchair users, and family members (where relevant), understand how to use and care for the cushion correctly.
• Mark the cushion “front” and “back” or “up” and “down” if necessary.
6. Does this cushion work for children?[edit | edit source]
• Yes, this cushion would work for children. However, the seat bone well needs to be smaller, so work out the dimensions for a child-size cushion.
•Many children who use wheelchairs need additional postural support.
Checking Cushion fit[edit | edit source]
Always check that the seat bones sit just within the seat bone well and not on the edge or on the high part of the cushion. Always check when fitting a pressure relief cushion for a wheelchair user that:
• the pressure under the seat bones is “safe” and
• the seat bones are sitting inside the seat bone well and not on the edge or top layer.
References[edit | edit source]
- ↑ 1.0 1.1 RESNA Wheelchair Service Provision Guidehttps://www.resna.org/sites/default/files/legacy/resources/position-papers/RESNAWheelchairServiceProvisionGuide.pdf
- ↑ Guidelines on the provision of Manual Wheelchairs in less resourced settings,Page no.76-77http://www.who.int/disabilities/publications/technology/English%20Wheelchair%20Guidelines%20(EN%20for%20the%20web).pdf
- ↑ 3.0 3.1 Guidelines on the provision of Manual Wheelchairs in less resourced settings,3.Service delivery ,Page No. 82:Product preparationhttp://www.who.int/disabilities/publications/technology/English%20Wheelchair%20Guidelines%20(EN%20for%20the%20web).pdf
- ↑ 4.0 4.1 4.2 4.3 4.4 World Health Organisation; Wheelchairervicetraining package; Reference Manual For Participants; Basic Level; Step 5 Product Wheelchair preparation; Page No.55,56http://apps.who.int/iris/bitstream/handle/10665/78236/9789241503471_reference_manual_eng.pdf?sequence=1 .
